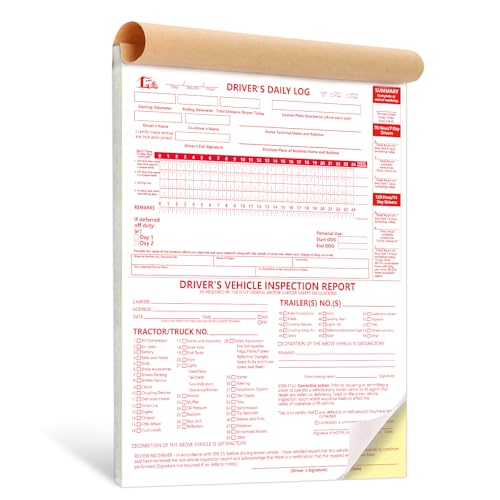
A pre-trip inspection is a walkaround check of your truck and trailer before every trip, covering brakes, tires, lights, fluids, and the coupling, so you catch a problem in the yard instead of on the highway. It is the habit that keeps you safe, keeps you legal, and keeps a small fix from turning into a breakdown or a wreck.
Nobody loves doing a pre-trip at five in the morning in the cold. But the drivers who have been at this a long time will tell you the same thing: the minutes you spend walking the rig are the cheapest insurance you will ever buy. A soft tire found in the yard is an annoyance. That same tire found at highway speed is a blowout. This is a plain checklist you can work through, section by section, so nothing gets missed, along with the numbers, tables, and mistakes that separate a real inspection from a lap around the truck with a coffee in your hand.
Key Takeaways
- A pre-trip inspection is federally required. FMCSA rules say the driver must be satisfied the vehicle is in safe operating condition before driving and must review the last driver vehicle inspection report.
- Brakes, tires, and lights generate the largest share of roadside out-of-service violations, so those three systems deserve the most attention on every walkaround.
- A thorough pre-trip usually takes 15 to 30 minutes and counts as on-duty (not driving) time, which quietly eats into your 14-hour window.
- Federal steer tires must have at least 4/32 inch of tread and all other tires at least 2/32 inch, but always confirm the current minimums because rules change over time.
- The single best safety upgrade is consistency: same starting corner, same direction, same order, every single trip, so your hands notice trouble before your brain does.
- A caught defect in the yard is cheap. The same defect found roadside can mean a citation, an out-of-service order, a costly tow, and lost revenue for the day.
Why the pre-trip matters more than drivers think
It is easy to treat the pre-trip as a formality, a box you check so nobody yells at you. That mindset is exactly how good drivers end up on the side of the interstate. The pre-trip is the one point in your day where a cheap, low-stakes fix is still possible. Once you are rolling, every one of those small problems gets more expensive and more dangerous.
Think about the math in rough terms. A pre-trip costs you 15 to 30 minutes. A roadside out-of-service order can cost you the rest of the day, a tow, a repair bill, and the load. If a defect contributes to a crash, the numbers stop being about money at all. You do not need exact figures to see that the trade is lopsided in favor of walking the truck.
There is also the compliance angle. Roadside inspections feed your carrier safety record. Brakes, tires, and lights show up over and over near the top of the national violation lists published by the FMCSA and the Commercial Vehicle Safety Alliance. Almost every one of those violations is something a real walkaround would have caught in the yard. So the pre-trip is not just personal safety, it is protecting the score that follows you and your carrier around.
Start at the cab, before you even walk
Before you climb down, do the easy stuff from the seat. Turn the key, let your air build, and watch your gauges. On a healthy air system, the compressor should build from around 85 to 100 psi up toward 120 to 135 psi in a reasonable amount of time, and if it is crawling or stalling out, that is a flag. Check that your low-air warning buzzer and light activate by fanning the brakes down, and they should come on before pressure falls below roughly 60 psi. Keep fanning and the tractor protection valve should pop out where it should, typically somewhere in the 20 to 45 psi range.
Test your horn, wipers, and washer spray, and set your mirrors so you can see down both sides. Then turn on every light you have, four-ways included, so they are lit up while you walk. Doing the electrical stuff first means you are not walking back to the cab three times.
The applied-pressure leak test, by the numbers
This is the one cab test drivers most often fudge, and it is worth doing right every time. With the system fully charged and the engine off, release the brakes, then apply and hold firm pressure on the brake pedal. Watch the gauge. For a combination vehicle, the air pressure should not drop more than about 3 to 4 psi in one minute. For a single vehicle the allowance is tighter, around 2 to 3 psi per minute. If it bleeds off faster than that, you have a leak to chase before you move.
The walkaround: work your way around the rig
Start at the driver door and move around the whole truck and trailer in one direction so you never skip a corner. Look, listen, and touch. Pick a direction and never break it. Here is what you are checking as you go.
Brakes
Brakes are the one system you never gamble on. Look at the brake chambers and slack adjusters at each wheel and check for anything loose, cracked, or leaking air. Listen for air leaks with the system charged. Eyeball the linings and drums or rotors where you can see them, watching for worn pads, cracks, or grease on the friction surface. On many common brake chambers, pushrod travel that exceeds roughly 2 inches when the brakes are firmly applied means the brake is out of adjustment and needs attention, though the exact limit depends on the chamber type, so know the ones on your rig. If you run air brakes, do your applied-pressure leak test and low-air checks every time.
A worked example: say you crawl under and find a slack adjuster where the pushrod is traveling well past 2 inches on a standard chamber. That one wheel can put the whole rig out of service on a roadside inspection, and it also means that brake is doing less than its share of the stopping. Catching it now is a shop appointment. Catching it on a downgrade is an emergency.
Tires and wheels
Tires carry your whole load and they are where a lot of roadside violations come from. On each tire, check for:
- Proper inflation. Thump them or, better, use a gauge. A tire that looks a little low may be way down, and a dual that is 20 psi under its mate is quietly overloading the good tire next to it.
- Tread depth. Steer tires and all other tires have different minimums under the rules, so know them and carry a tread gauge.
- Cuts, bulges, cracks, or anything stuck in the tread.
- No two tires touching on a dual set, and no debris wedged between them.
Then look at the wheels themselves. Check for cracked or bent rims, missing or loose lug nuts, and rust streaks or shiny marks around the studs that hint a nut has been working loose. Make sure valve stems are capped and not leaking.
Here is a quick reference for the tread-depth and inflation basics. Treat the tread numbers as the federal floor and confirm current values, because rules and carrier policies change.
| Tire position | Federal minimum tread | Practical replace-soon point | What low pressure does |
|---|---|---|---|
| Steer tires | 4/32 inch | Around 5 to 6/32 inch | Wandering, slow blowout risk, poor steering |
| Drive tires | 2/32 inch | Around 4/32 inch | Traction loss, uneven wear, heat buildup |
| Trailer tires | 2/32 inch | Around 4/32 inch | Overloads the mated dual, heat, blowouts |
A worked example on inflation: a properly loaded drive tire might call for something in the range of 100 to 110 psi depending on the tire and load. If one tire in a dual set is sitting 15 to 20 psi low, its partner is carrying more than its share, running hotter, and heading toward failure. Five seconds with a gauge in the yard prevents a tire fire on the shoulder.
Lights and reflectors
You want every lamp working and every lens clean. Walk the rig with the lights on and confirm the following are lit and not cracked or caked in mud.
| Light or marker | Where to look | Common problem |
|---|---|---|
| Headlights, high and low | Front of tractor | Burned-out bulb, aimed wrong |
| Turn signals and four-ways | Front, sides, rear | Fast flash means a dead bulb |
| Brake lights | Rear of trailer | Bad switch or ground |
| Clearance and marker lamps | Cab roof, trailer sides and top | Cracked lens, corrosion |
| Tail and license plate lights | Rear of trailer | Dead bulb, missing plate light |
| Reflective tape and reflectors | Sides and rear | Peeling, dirty, missing |
A single burned-out marker lamp is an easy ticket and an easy fix, worth the extra minute. Carry spare bulbs and fuses so a dead lamp found in the yard is a two-minute repair instead of a reason to sit.
Fluids and leaks
Pop the hood and check your levels: engine oil, coolant, power steering, and washer fluid. Look at the belts and hoses for cracks, fraying, or looseness, and press on a belt to feel for the right tension rather than a loose, glazed one. Then look under the truck. Any puddle or drip on the ground tells a story, so figure out what color it is and where it is coming from. Use this quick guide.
| Fluid color | Likely source | Why it matters |
|---|---|---|
| Green or orange | Coolant | Overheat risk, can strand you fast |
| Amber to black | Engine oil | Lubrication loss, expensive to ignore |
| Reddish | Transmission or power steering | Shifting or steering trouble ahead |
| Clear and oily | Fuel or hydraulic | Fire risk, wasted fuel, check lines |
A slow leak in the yard is a roadside breakdown waiting to happen. A steady drip that fills a small puddle overnight is telling you something is going to run dry at the worst possible time.
The coupling: fifth wheel, kingpin, and lines
The connection between your tractor and trailer is what everything else hangs on, so give it a close look. Check that the fifth wheel jaws are locked fully around the kingpin with no gap, and that the locking handle is in its closed position and the safety latch is set. Look for a mounting that is solid with no cracks, missing bolts, or shifting. Make sure the trailer is riding on the fifth wheel plate and not up on the apron, which is a sign of a high hitch that can drop the trailer.
Then check your lines and connections. Your air lines, the red and blue gladhands, and your electrical pigtail should be seated tight, not cracked, not rubbing, and not dragging near the driveshaft or the ground. Give the landing gear a look too and make sure it is fully cranked up and the handle is secured. A tug test, gently pulling against the locked fifth wheel in low gear with the trailer brakes set, confirms the coupling is truly locked before you trust it with the load.
Load, paperwork, and the last look
If you are hauling freight that needs securement, check your straps, chains, binders, or load bars for tension and wear before you pull out. The securement rules set minimums based on cargo weight, so as a rough rule of thumb the working load limit of your tie-downs should total at least half the weight of the cargo, with a minimum number of tie-downs based on length. Confirm your doors are latched and, if needed, sealed. Have your registration, insurance card, medical card, and any permits where you can reach them, and review the last driver vehicle inspection report so you know if the previous driver flagged anything.
A quick note on the clock while you are at it. A thorough pre-trip is on-duty time, not driving time, and it eats into your day. If you spend 20 minutes on the pre-trip, that is 20 minutes off your 14-hour on-duty window before you have turned a wheel. To see how your inspection, fueling, and stops stack up against your driving window, our Hours of Service Calculator helps you plan so you are not caught short. And if you cross state lines, keeping clean fuel records for the IFTA Fuel Tax Calculator starts with the same habit of checking your numbers before you roll.
Common mistakes drivers make
Even experienced drivers fall into the same traps. Here are the ones that cause trouble most often.
- Walking the same lap without touching anything. Looking is not inspecting. You need hands on the slack adjusters, a gauge on the tires, and a press on the belts. A visual-only pass misses soft tires and loose hardware.
- Skipping the air brake tests. The leak-down test, low-air warning, and tractor protection valve checks get skipped because they take a few minutes. Those minutes are the difference between working brakes and a runaway.
- Fudging tread and inflation. Thumping a tire tells you almost nothing once it is more than a little low. Guessing tread by eye fails you right at the legal line. Carry and use a gauge.
- Ignoring the last DVIR. If the previous driver wrote up a defect and you never read it, you can end up driving a truck that was already flagged as unsafe, which is both dangerous and a violation.
- Rushing when you are running late. The morning you are behind is exactly the morning something is wrong. A blowout or an out-of-service order costs far more time than the inspection you skipped.
- Not carrying spares. A dead marker lamp or blown fuse should be a two-minute fix in the yard. Without spare bulbs and fuses, it becomes a reason to sit or a ticket down the road.
- Forgetting the coupling tug test. Assuming the fifth wheel is locked because it looks locked is how trailers end up on the ground. The gentle pull test takes seconds.
Make it a routine you never skip
The drivers who stay out of trouble are not the ones with the best memory. They are the ones who do the same walkaround the same way every time, so their hands know when something feels wrong before their brain catches up. Pick a direction, start at the same corner, and never break the pattern. Say the checks out loud if it helps, the way drivers do on a CDL exam, because naming each part forces your eyes to actually land on it.
Build the pre-trip into your day as a fixed cost, not an optional extra. Budget the 15 to 30 minutes into your start time so you are never choosing between a real inspection and getting rolling. When the inspection is just part of how the day begins, the temptation to shortcut it disappears.
Rules and tread-depth minimums do change over time, and states and carriers can add their own requirements on top of the federal ones. For the official word, check with the FMCSA at fmcsa.dot.gov or your own safety department. But no rulebook replaces the simple act of walking your rig and trusting your eyes and hands. Do the pre-trip, every trip.
This article is general information from research, not professional or legal advice. Verify current requirements with the FMCSA or a qualified professional before you rely on them.